How to use GitHub Actions with APPUiO Cloud
GitHub Actions enables developers to automate, customize, and execute your software development workflows right in your repository.
This page will describe the required steps to use GitHub Actions successfully with APPUiO Cloud.
| This information is provided as a courtesy for APPUiO Cloud users. We don’t provide support for GitHub Actions, and in case of issues, you are invited to check the official documentation. |
Requirements
To follow this guide, please make sure that you have the following elements:
- GitHub account
-
You can create one for free at github.com.
oc-
You can download the OpenShift command directly from APPUiO Cloud, selecting the help menu (marked as a question mark) and selecting the "Command line tools" entry.
Procedure
This section explains the steps required to use GitHub Actions with APPUiO Cloud.
1. Login to APPUiO Cloud
Follow these steps to login to APPUiO Cloud on your terminal:
-
Login to the APPUiO Cloud console:
oc login --server=https://api.${zone}.appuio.cloud:6443You can find the exact URL of your chosen zone in the APPUiO Cloud Portal.
This command displays a URL on your terminal:
You must obtain an API token by visiting https://oauth-openshift.apps.${zone}.appuio.cloud/oauth/token/request -
Click on the link above and open it in your browser.
-
Click "Display token" and copy the login command shown as "Log in with this token"
-
Paste the
oc logincommand on the terminal:oc login --token=sha256~_xxxxxx_xxxxxxxxxxxxxxxxxxxxxx-xxxxxxxxxx-X \ --server=https://api.${zone}.appuio.cloud:6443 -
Create a new project called "[YOUR_USERNAME]-fortune-go"
oc new-project [YOUR_USERNAME]-fortune-go
2. Clone the sample "Fortune in Go" project
The "Fortune in Go" project provides a very simple Go application to start with.
-
Login to your GitHub account.
-
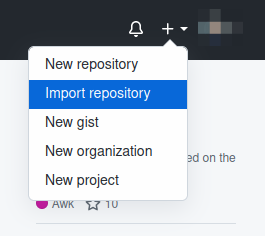
Click on the
+sign on the top right and select "Import repository" as shown in the screenshot below:
-
Enter the URL of the project:
-
Enter
fortune-goas the name of the project in your profile. -
Clone the project:
git clone git@github.com:[YOUR_GITHUB_USERNAME]/fortune-go.git -
cdinto it:cd fortune-go -
Since the code has been imported from another repository, GitHub Actions aren’t automatically available. Enable them by going to the screen and selecting the "Allow all actions" option.
3. Add a Deployment File
Add a file named deployment.yaml at the root of the project with the following information:
apiVersion: apps.openshift.io/v1
kind: DeploymentConfig
metadata:
  name: fortune-go
spec:
  replicas: 1
  template:
    spec:
      containers: (1)
      - image: registry.[YOUR_CHOSEN_ZONE].appuio.cloud/[YOUR_USERNAME]-fortune-go/fortune-go:latest
        imagePullPolicy: Always
        name: fortune-container
        ports:
        - containerPort: 8080
    metadata:
      labels:
        app: fortune-go
---
apiVersion: v1
kind: Service
metadata:
  name: fortune-go
spec:
  ports:
    - port: 8080
      targetPort: 8080
  selector:
    app: fortune-go
  type: ClusterIP
---
apiVersion: networking.k8s.io/v1
kind: Ingress
metadata:
  annotations:
    cert-manager.io/cluster-issuer: letsencrypt-production
  name: fortune-go-ingress
spec:
  rules:
  - host: [YOUR_USERNAME]-fortune-go.apps.[YOUR_CHOSEN_ZONE].appuio.cloud (1)
    http:
      paths:
      - pathType: Prefix
        path: /
        backend:
          service:
            name: fortune-go
            port:
              number: 8080
  tls:
  - hosts:
    - [YOUR_USERNAME]-fortune-go.apps.[YOUR_CHOSEN_ZONE].appuio.cloud
secretName: fortune-go-cert| 1 | Remember to customize the parts marked as [YOUR_USERNAME] and [YOUR_CHOSEN_ZONE] to your liking (and according to the Zones documentation page). |
|
About URL lengths
Make sure that the total length of the prefix string
If your Ingress doesn’t generate a route after deploying your application, shorten the URL in your YAML and redeploy. |
4. Configure Secrets
To be able to communicate with APPUiO Cloud, GitHub Actions use secrets. And to connect GitHub Actions to APPUiO Cloud we’re going to use a dedicated service account.
-
Create a service account
oc create sa github-actions -
Add the proper role to the service account:
oc adm policy add-role-to-user edit -z github-actions -
On your laptop, copy the token of the service account:
oc sa get-token github-actions -
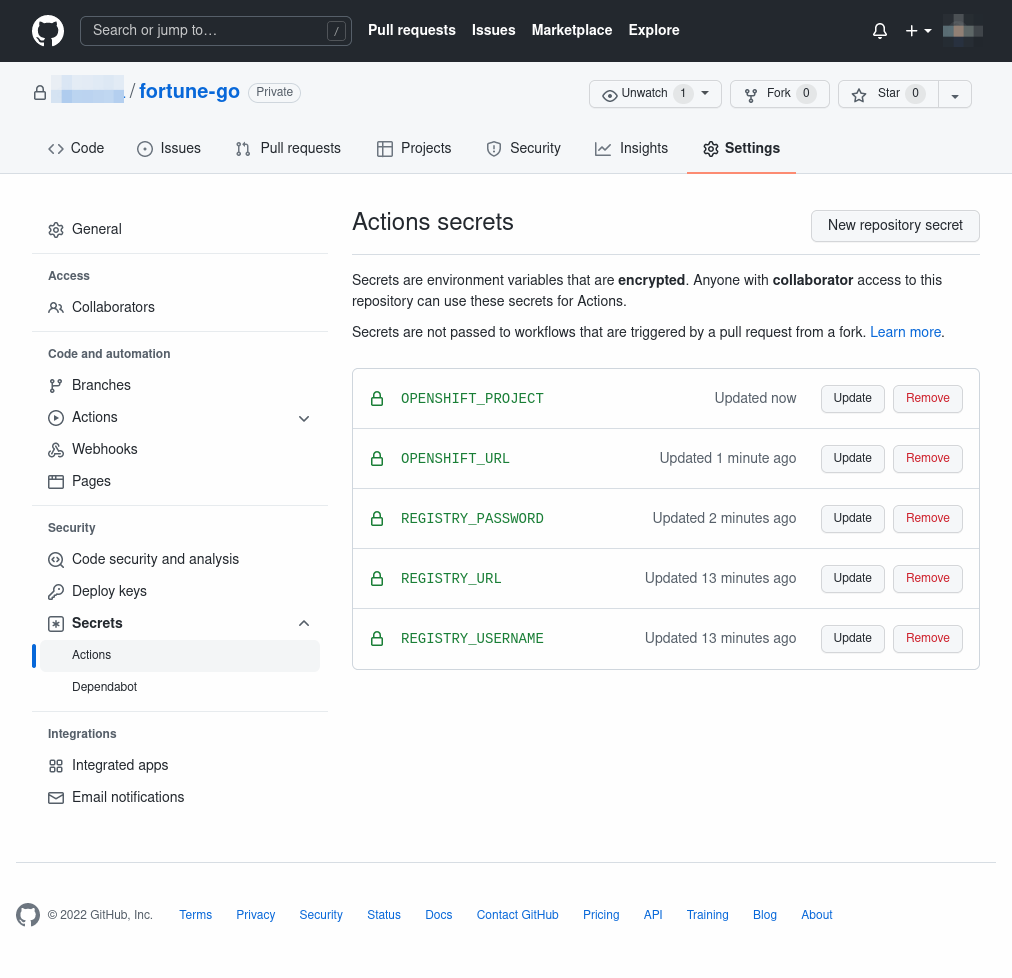
On GitHub, select the screen and click on the New repository secret button.
-
Create the following secrets:
-
REGISTRY_USERNAME: Should begithub-actions. -
REGISTRY_PASSWORD: The token you copied in the previous step, corresponding to thegithub-actionsservice account. -
REGISTRY_URL: The URL to the "Integrated Cluster Registry Domain" in your chosen APPUiO Cloud zone, as defined in the Zones page in the APPUiO Cloud Portal. -
OPENSHIFT_URL: The URL to the "Kubernetes API endpoint" in your chosen APPUiO Cloud zone, as defined in the Zones page in the APPUiO Cloud Portal. -
OPENSHIFT_PROJECT: The name of the project you created at the beginning of this guide, which should be[YOUR_USERNAME]-fortune-go.
-

5. Add a GitHub Actions Workflow
GitHub Actions are defined in YAML, in files stored in the .github/workflows folder. For APPUiO Cloud, you can use a workflow similar to this one, with two jobs: one to build and push the container to the APPUiO Cloud registry, and another to deploy the latest version of the application.
| Since the code has been imported (step 2 above), GitHub Actions aren’t automatically enabled in your repository. Remember to enable them by going to the screen and selecting the "Allow all actions" option. |
-
Create the
.github/workflowsfolder in your project.mkdir -p .github/workflows -
Create a file named
.github/workflows/master.ymlwith the following contents:name: ci on: push: branches: - 'master' jobs: docker: runs-on: ubuntu-latest steps: - uses: actions/checkout@v1 - name: Login to APPUiO Cloud Registry run: echo ${{ secrets.REGISTRY_PASSWORD }} | docker login --username ${{ secrets.REGISTRY_USERNAME }} --password-stdin ${{ secrets.REGISTRY_URL }} - name: Build the latest Docker image run: docker build . --file Dockerfile --tag ${{ secrets.REGISTRY_URL }}/${{ secrets.OPENSHIFT_PROJECT }}/fortune-go:latest - name: Push the latest Docker image run: docker push ${{ secrets.REGISTRY_URL }}/${{ secrets.OPENSHIFT_PROJECT }}/fortune-go:latest deploy: runs-on: ubuntu-latest needs: docker steps: - uses: actions/checkout@v1 - name: Login to APPUiO Cloud Project run: oc login --token=${{ secrets.REGISTRY_PASSWORD }} --server=${{ secrets.OPENSHIFT_URL }} - name: Select project run: oc project ${{ secrets.OPENSHIFT_PROJECT }} - name: Deploy application run: oc apply --overwrite --filename deployment.yaml - name: Rollout latest version run: oc rollout latest dc/fortune-go
The workflow above uses the ubuntu-latest runner, which contains various developer tools ready to use, including the latest version of the OpenShift CLI.
|
6. Push your Changes
Commit your changes in Git, as you would with any other project:
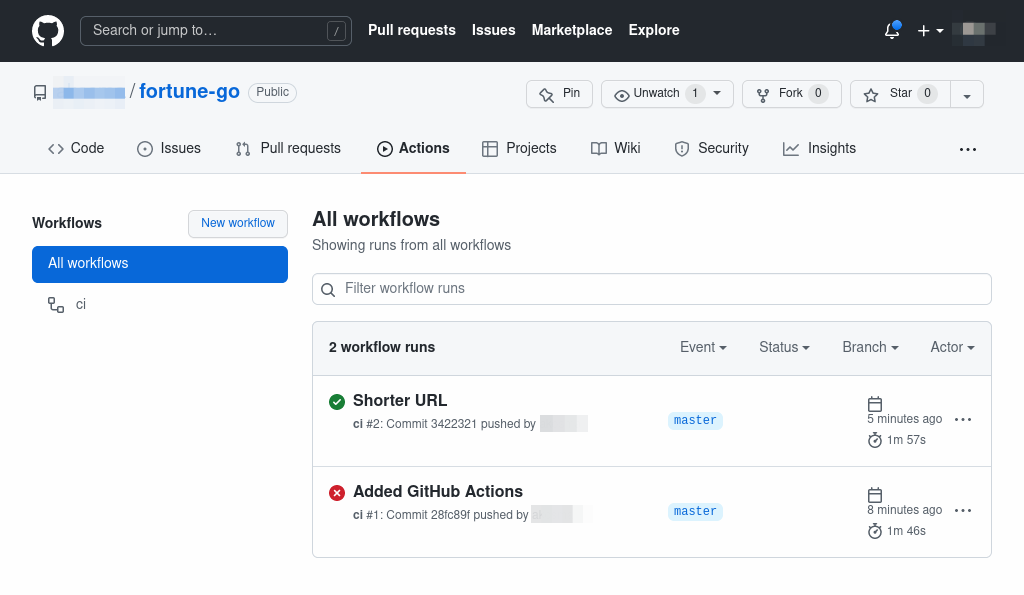
git add . && git commit -m "Added GitHub Actions" && git pushGo to your project’s Actions screen, and you should see your workflow running. It should be already at work, building your container image, pushing it to the APPUiO Cloud registry, and deploying your application to the cluster.

The first run fails because the oc rollout command returns an error when the application is deployed for the first time.
|
Now you can push any change to your project, and GitHub Actions will automatically rebuild your image, push it, and redeploy it, increasing your productivity.
Tips & Tricks
Here go some ideas to use GitHub Actions efficiently:
-
For the sake of simplicity, this guide uses a
DeploymentConfig, which is an OpenShift-specific feature, conveniently providing theoc rollout latestfeature used in the workflow. For more complex scenarios it’s recommended, however, to use tagged images and tagged releases, which can be configured through standard KubernetesDeploymentobjects instead. -
GitHub Actions have plenty of configuration options. Check the official documentation to learn more.
-
Help your team adopt GitHub Actions by adding the appropriate information in your project’s README file.
