Connect GitLab to APPUiO Cloud
 This page explains how to connect your GitLab project to APPUiO Cloud for your GitOps operations.
This integration has three significant aspects:
-
Configuring APPUiO Cloud as a Kubernetes cluster for your GitLab project with the Agent.
-
Configuring APPUiO Cloud as a Kubernetes cluster for your GitLab project without the Agent.
-
Connecting APPUiO Cloud to access your GitLab project’s container registry.
Prerequisites
For this guide, you need:
-
A GitLab project (either on gitlab.com or in a private instance).
-
Log in to your APPUiO Cloud project using the
oc logincommand, and select your project.
Configuring APPUiO Cloud as a Kubernetes cluster in GitLab with the Agent
To configure your APPUiO Cloud project as a Kubernetes cluster in GitLab using the new GitLab Agent, follow the steps outlined below.
| Given the shared nature of APPUiO Cloud, the GitLab Agent can’t be installed cluster-wide, but it can be installed organization-wide, however, as shown in this section. |
On your GitLab instance:
-
Create a file named
.gitlab/agents/appuio-cloud/config.yamlin your GitLab project; commit and push. -
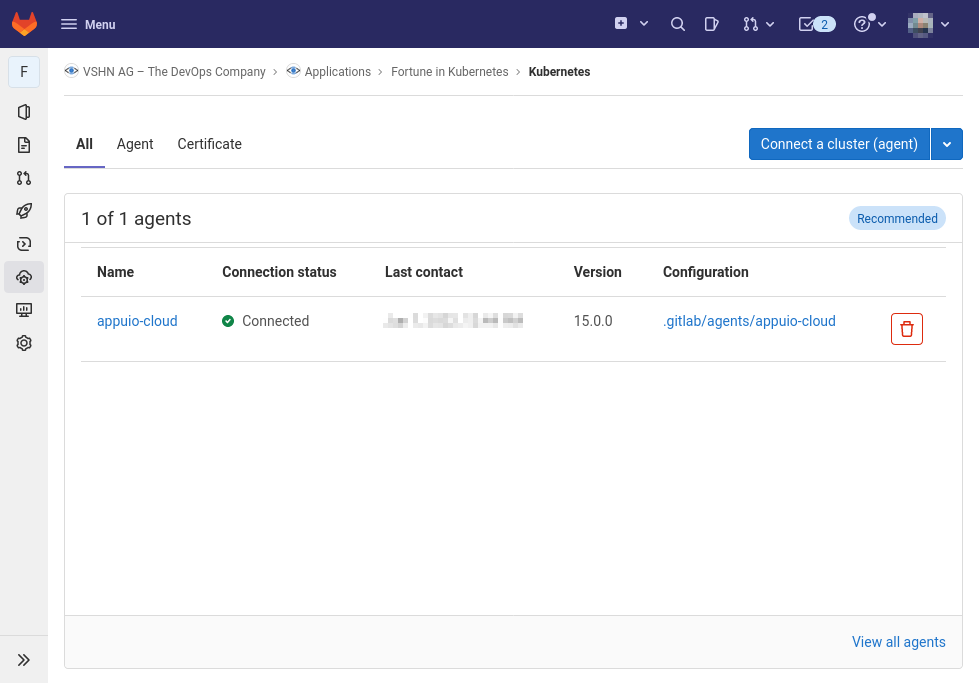
In GitLab, select the screen and click the Connect a cluster (agent) button.
-
In the popup that opens, click on Select an agent or enter a name to create new and select the
appuio-cloudentry, corresponding to the file created above. -
Copy the GitLab Agent token shown in the popup, as it won’t appear anymore.
In your terminal, perform the following steps:
-
Add the GitLab repository to
helmand update:helm repo add gitlab https://charts.gitlab.io && helm repo update -
Use the GitLab Agent token in the following command:
GITLAB_AGENT_TOKEN=<the-token> (1)
helm upgrade --install gitlab-agent gitlab/gitlab-agent \
    --set config.token=${GITLAB_AGENT_TOKEN} \
    --set config.kasAddress=wss://kas.gitlab.com \
    --set rbac.create=false
1 The GitLab Agent’s access token
If you’re using a self-hosted GitLab instance, change the value of the config.kasAddress parameter to match your own.
|
-
Grant namespace admin permissions for the Agent’s service account:
oc policy add-role-to-user admin -z gitlab-agent --rolebinding-name gitlab-agent
You can now modify your .gitlab-ci.yml file to deploy your manifests whenever needed; for example, every time a new tag is pushed:
variables:
  TARGET_PROJECT: gitlab-agent-test

stages:
  - deploy

master:deploy:
  stage: deploy
  image: docker.io/appuio/oc:v4.9
  environment:
    name: production
  script:
    - oc config get-contexts (1)
    - oc config use-context username/project-name:appuio-cloud (2)
    - oc -n $TARGET_PROJECT apply -f deployment
    - oc -n $TARGET_PROJECT apply -f appuio-cloud
  only:
- tags| 1 | This will print in the CI/CD console of the job runner the list of available contexts, which might be helpful in case of a failure. |
| 2 | The username/project-name value must match those of your project; the appuio-cloud name corresponds to the file .gitlab/agents/appuio-cloud/config.yaml created previously. |
Reusing the GitLab Agent from other Projects
You can reuse this GitLab Agent instance from other projects.
Let’s imagine that it’s installed in a project called gitlab-agent-test.
-
Create another project:
oc new-project new-project-name -
Grant namespace admin permissions to the GitLab Agent service account, even though it’s not installed:
oc policy add-role-to-user admin -z gitlab-agent --rolebinding-name gitlab-agentThis line will show a warning: "ServiceAccount 'gitlab-agent' not found."
-
Edit the new
RoleBindingcalledgitlab-agentand change the namespace, pointing to the correct one:oc edit rolebinding gitlab-agentThis will open your $EDITOR with the contents of the
RoleBinding; edit thesubjects[0].namespacevalue to point to thegitlab-agent-testproject:# Please edit the object below. Lines beginning with a '#' will be ignored, # and an empty file will abort the edit. If an error occurs while saving this file will be # reopened with the relevant failures. # apiVersion: rbac.authorization.k8s.io/v1 kind: RoleBinding metadata: creationTimestamp: "2022-06-01T10:45:30Z" name: gitlab-agent namespace: new-project-name resourceVersion: "303705680" uid: dae7f5f5-7030-41b9-9371-9bee8bcaab30 roleRef: apiGroup: rbac.authorization.k8s.io kind: ClusterRole name: admin subjects: - kind: ServiceAccount name: gitlab-agent namespace: new-project-name (1)1 Change this line to point to the gitlab-agent-testnamespace instead.
Now you can deploy from GitLab into other projects belonging to your organization, using a single GitLab Agent installed in the gitlab-agent-test project.
Configuring APPUiO Cloud as a Kubernetes cluster in GitLab without the Agent
To configure your APPUiO Cloud project as a Kubernetes cluster in GitLab, follow the steps that are outlined in more detail below:
-
Create a service account in your project.
-
Add an elevated role to this service account.
-
Create a secret associated to the service account.
-
Create a local
KUBECONFIGvariable and log in to your OpenShift cluster. -
Create a variable named
KUBECONFIGin the GitLab settings.
The following commands show the steps in detail:
oc project [PROJECT-NAME]
oc create serviceaccount gitlab-ci
oc policy add-role-to-user admin -z gitlab-ci --rolebinding-name gitlab-ci
oc apply -f - <<EOF
apiVersion: v1
kind: Secret
metadata:
    name: gitlab-ci-secret
    annotations:
        kubernetes.io/service-account.name: gitlab-ci
type: kubernetes.io/service-account-token
EOF
Create a local KUBECONFIG variable and login to your OpenShift cluster using the gitlab-ci service account:
TOKEN=$(oc get secret/gitlab-ci-secret -ogo-template='{{.data.token|base64decode}}')
export KUBECONFIG=gitlab-ci.kubeconfig
oc login --server=$OPENSHIFT_API_URL --token=$TOKEN (1)
unset KUBECONFIG| 1 | Replace $OPENSHIFT_API_URL with the APPUiO Zone’s API URL |
You should now have a file named gitlab-ci.kubeconfig in your current working directory.
Copy its contents and create a variable named KUBECONFIG in the GitLab settings with the value of the file (that’s under ).
Remember to set the type "File" and "environment" scope for the variable and to disable any previous Kubernetes integration, as the KUBECONFIG variable might collide with this new variable.
Connecting APPUiO Cloud to the GitLab Container Registry
To configure your GitLab container registry in your APPUiO Cloud project, follow these steps:
-
Create a deploy token in GitLab.
-
Create a secret in APPUiO Cloud.
-
Specify the secret in your deployment.
Create a Deploy Token in GitLab
Follow these steps to create a new deploy token in your GitLab project:
-
In your GitLab project, select and expand the item, and scroll to the bottom to select the Connect existing cluster button.
-
Provide a name, an (optional) expiration date, and a an (optional) username.
-
Check the
read_registrycheckbox. -
Click the Create deploy token button.
-
Copy the token immediately; it won’t be shown ever again.
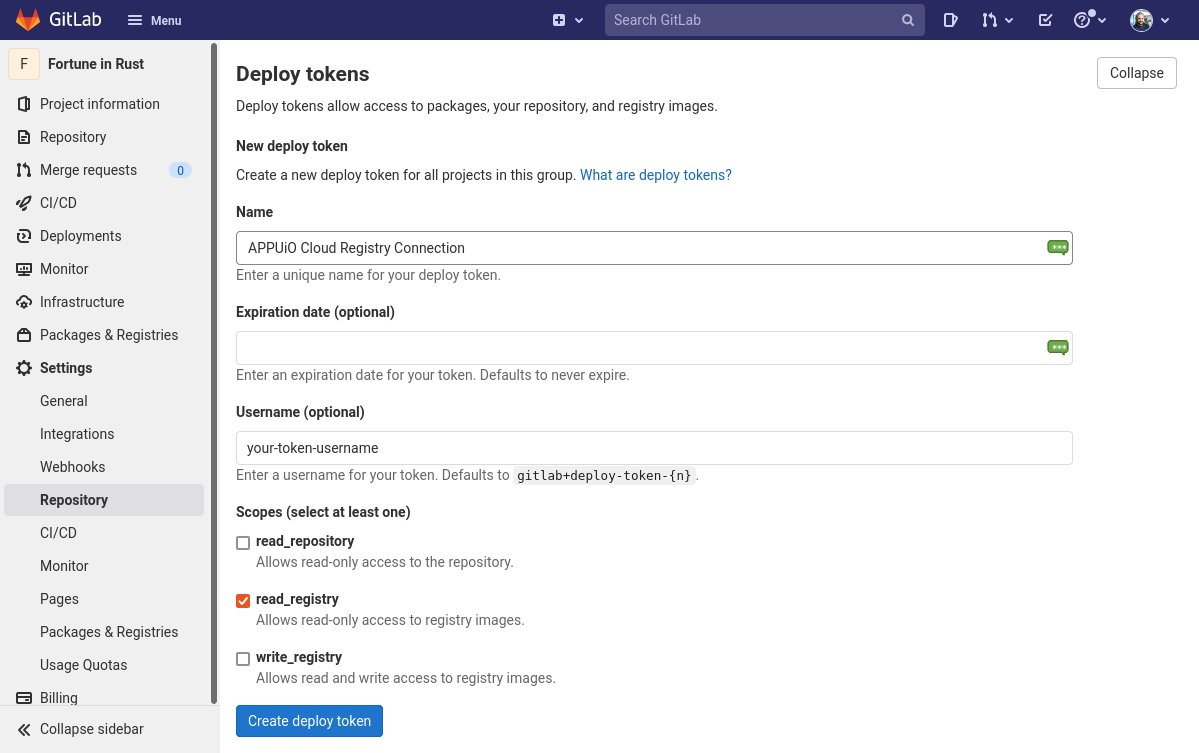
If no name is provided, GitLab provides a default username of the form gitlab+deploy-token-{n}.
|
Create a Secret
The oc command below creates a secret with the required values.
Replace the --docker-username and --docker-password values with those used in the previous step.
Also replace the --docker-server parameter with the URL of your own GitLab instance if you have one.
oc create secret docker-registry gitlab-pull-secret \
	--docker-server=https://registry.gitlab.com \
	--docker-username=your-token-username \   (1)
--docker-password=xXXxXxxXXXxXXXxXXXxX (2)| 1 | The username is the same one entered in the GitLab token form shown above in step 2, or else the default name generated by GitLab. |
| 2 | The value of the token, copied in step 5 above. |